Floating kitchen cabinets have transformed how homeowners approach storage and design. Unlike traditional base cabinets that rest on the floor, floating cabinets are mounted directly to wall studs, creating an open, contemporary look that works in everything from minimalist kitchens to transitional spaces. They’re not just a trend, they solve real problems for people with tight floor plans, aging knees, and a desire for a kitchen that feels less cramped. If you’re considering a kitchen remodel or even a quick update, understanding floating cabinets is essential.
Table of Contents
ToggleKey Takeaways
- Floating kitchen cabinets are wall-mounted storage units anchored directly to wall studs using steel mounting rails or brackets, creating an open, contemporary look that works in any kitchen style.
- They provide practical benefits including easier cleaning underneath, better mobility access, and the visual impression of more floor space—making them ideal for small kitchens and homes with accessibility needs.
- Proper installation of floating cabinets requires locating studs, using structurally rated mounting hardware (½-inch lag bolts or structural screws), and ensuring the mounting rail is perfectly level before hanging the cabinet box.
- Design flexibility is a major advantage: floating kitchen cabinets come in finishes ranging from white lacquer to natural wood and two-tone combinations, allowing them to complement both modern and traditional kitchen aesthetics.
- Common installation challenges like sagging, uneven doors, and backsplash integration can be prevented by using quality tools, verifying stud locations, and planning your wall finish before mounting.
- Stock floating cabinets typically cost $100–$300 per linear foot with faster delivery, while custom options run $200–$500 per linear foot but offer specific dimensions and style preferences.
What Are Floating Kitchen Cabinets?
Floating kitchen cabinets are wall-mounted storage units that have no legs or support running to the floor. Instead, they’re anchored to the wall framing using a steel mounting rail or heavy-duty brackets secured directly into wall studs (the vertical 2×4 or 2×6 lumber behind drywall). The cabinet box itself is hollow and extends outward from the wall, giving the illusion that it’s suspended in air.
The key structural difference from standard base cabinets lies in how weight is distributed. Traditional cabinets bear load on the floor: floating cabinets transfer their weight directly into the home’s framing, which means they need proper installation into studs, not just drywall anchors. Most mounting systems use a steel French cleat (a beveled rail system) or pre-drilled holes aligned with studs to handle the load.
Floating cabinets typically range from 12 to 24 inches deep and can span anywhere from 24 inches to 4 feet wide, though longer runs benefit from multiple mounting points. They’re available ready-made from most cabinet suppliers or can be custom-built if you need specific dimensions or styles.
Why Homeowners Choose Floating Cabinets
Aesthetic Appeal and Modern Design
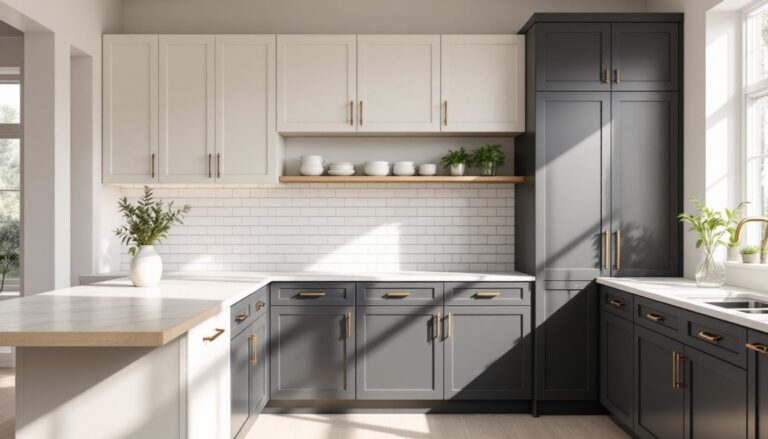
Floating cabinets create visual lightness. Because you can see the wall (or backsplash tile) beneath them, the kitchen doesn’t feel as visually heavy as it does with traditional base cabinetry running the full height of the wall. This works beautifully in small kitchens, where every inch of visual space counts. Many homeowners pair floating cabinets with open shelving or a decorative backsplash to amplify that modern, airy effect.
The style flexibility is significant too. Whether you choose white lacquer, natural wood, or mixed materials (wood fronts with metal frames), floating cabinets adapt to both contemporary and traditional design languages. They’re a staple in Scandinavian, industrial, and mid-century modern kitchens, the kind of aesthetic you see in kitchen design ideas that emphasize clean lines and uncluttered spaces.
Practical Benefits for Daily Use
Floating cabinets make cleaning underneath a breeze. No more reaching into narrow gaps between the base cabinet and floor to fish out dust and crumbs. That’s a small quality-of-life win that compounds over years of kitchen use. It’s especially valuable for anyone with mobility issues or back problems, no bending down to access lower cabinets.
They also create the visual impression of more floor space, which is gold in kitchens where square footage is limited. Homeowners often install floating cabinets on one wall and pair them with a kitchen island or open prep area on the opposite side, making the overall footprint feel less cramped. Storage density is identical to traditional cabinets: it’s the visual perception that shifts.
Installation Basics for DIY Projects
If you’re comfortable with basic carpentry and using power tools, mounting floating cabinets is achievable as a DIY project, but it requires precision and respect for structural requirements.
Essential Tools:
- Stud finder (non-magnetic works through paint)
- Level (a 24-inch level is ideal)
- Drill-driver with bits
- Circular saw or miter saw (if cutting cabinet ends)
- Tape measure
- Socket wrench set (for mounting hardware)
- Screwdriver set
Key Steps:
-
Locate wall studs using a stud finder and mark them with pencil. Standard stud spacing is 16 inches on center in modern homes, though older homes may vary. Mark studs from floor to ceiling for reference.
-
Install the mounting rail according to manufacturer specs. Most rails are bolted directly into at least two studs: longer cabinets need three or more mounting points. Use ½-inch lag bolts or structural screws rated for the weight you’re hanging. A typical floating cabinet holds 50–150 pounds once fully loaded: verify your cabinet’s load rating and mounting hardware specs.
-
Ensure the rail is perfectly level before tightening all fasteners. A level that’s even 1/8 inch off will make doors binding noticeable later. Measure from the wall to the rail at multiple points to confirm consistent depth.
-
Hang the cabinet by sliding or bolting it onto the mounting rail. Most floating cabinets arrive assembled: you’re essentially hanging a heavy box. A second pair of hands is highly recommended here, one person steadies the cabinet while the other drives fasteners.
-
Check for plumb and level again after mounting. Adjust shims if needed before fully tightening.
Safety Warning: If your wall has electrical outlets, plumbing, or gas lines, locate them before drilling. Use a multi-scanner or call a professional electrician if you’re unsure. Never assume where utilities run. Wear safety glasses when drilling overhead and hearing protection if using power tools for extended periods.
Design Ideas and Material Options
Floating cabinets come in nearly every finish imaginable. White is the most popular choice, it maximizes perceived space and pairs with any backsplash or countertop. Natural wood (oak, walnut, maple) adds warmth and works in both modern and traditional kitchens. Two-tone combinations (white uppers with wood lowers, for example) are increasingly common in transitional designs.
Materials matter for durability. Solid plywood boxes with veneer fronts are industry standard for residential kitchens. MDF (medium-density fiberboard) is cheaper but less moisture-resistant: it’s fine for pantries or dry areas but questionable above a sink. If budget allows, specify plywood interiors and solid wood or veneer-wrapped exteriors. This balance keeps cost reasonable while ensuring longevity.
Door styles range from flat-panel (modern, sleek) to Shaker-style (versatile, timeless) to glass fronts (display-oriented). Glass doors work beautifully if you’re willing to style and keep the interior tidy, but they add visual complexity if packed with everyday clutter. Consider your lifestyle, some people thrive with everything on display: others prefer doors that hide the mess.
One design tip: pair floating cabinets with an open shelf or two (or explore free woodworking plans for floating shelves) to create rhythm and break up a solid wall of cabinets. Floating shelves cost less than cabinets but provide visual interest and functional storage for cookbooks, decorative items, or frequently used kitchen tools.
Common Challenges and Solutions
Drooping or Sagging Over Time
This happens when cabinets are over-loaded or mounted into drywall instead of studs. Prevention is the cure: always verify stud location with a stud finder, use hardware rated for your cabinet’s full load (including contents), and avoid placing your heaviest items in floating cabinets. If a cabinet is already sagging slightly, it likely needs re-mounting into additional studs or hardware reinforcement. This isn’t a DIY fix, call a professional.
Uneven or Crooked Installation
A cabinet that’s not level will frustrate you every time you close the doors. Doors bind, shelves feel wrong, and the visual impact is immediately obvious. Always use a quality 24-inch level and double-check before tightening final fasteners. If mistakes happen, it’s easier to correct during installation than after. If you’ve already hung them crooked, shims behind the mounting rail can sometimes help, but re-mounting is often the better option.
Difficulty with Backsplash Integration
Floating cabinets expose the wall behind them, which means your backsplash (or lack thereof) becomes prominent. Plan your tile or paint finish before mounting. If you’re installing tile, lay it first or plan cuts carefully around the mounting hardware holes. Some people install cabinets first and tile around them: this is more forgiving but requires careful measuring.
Limited Access to Wall Studs
If your desired cabinet location falls between studs, you have options: use a toggle bolt system designed for heavy loads (not ideal for repeated access), move the cabinet slightly to align with studs, or consult a structural engineer about adding a mounting block (additional framing bolted to existing studs). The third option is sometimes worth the effort if you have your heart set on a specific location. Resources like woodworking project plans and workshop guides can help you understand proper framing if you’re considering DIY framing reinforcement.
Cost and Lead Time
Custom floating cabinets are pricier than stock units, expect $200–$500 per linear foot for quality custom work versus $100–$300 for pre-made stock cabinets. Lead times for custom orders can stretch 8–12 weeks. If you’re on a timeline or budget, stock cabinets from major manufacturers offer good design and faster delivery, though customization options are limited.