A kitchen backsplash might seem like a small detail, but it’s often the first thing people notice, and the quickest way to refresh your entire kitchen without a full renovation. Whether you’re a seasoned DIYer or tackling your first kitchen project, kitchen backsplash pictures offer endless inspiration for transforming that blank wall above your countertop into a focal point. From sleek modern designs to timeless subway tile classics, today’s backsplash options suit every budget, style, and skill level. This guide walks you through over 50 design ideas and practical considerations to help you choose and install the perfect backsplash for your kitchen.
Table of Contents
ToggleKey Takeaways
- Kitchen backsplash pictures reveal endless design possibilities, from modern minimalist white tiles to bold jewel-toned statements that can completely transform your kitchen without a full renovation.
- Subway tile remains the most installed and beginner-friendly backsplash option, costing just $2–$5 per square foot and taking only a weekend to install, making it ideal for DIY projects.
- Grout color dramatically changes the final appearance of your backsplash—darker grout emphasizes pattern and adds visual interest, while lighter grout creates a subtle, minimalist effect.
- Natural stone and marble backsplashes add luxury but require professional installation and regular sealing every 3–6 months to prevent staining and damage from acidic foods and cleaners.
- Budget-friendly alternatives like peel-and-stick tiles ($50–$150) or painted drywall offer temporary solutions for renters, while DIY installation of ceramic tiles saves 40–50% compared to hiring professionals.
- Always pull tile samples and observe them in your kitchen at different times of day before committing, since lighting and your existing cabinets and countertops significantly impact how colors and finishes appear.
Modern Minimalist Backsplash Designs
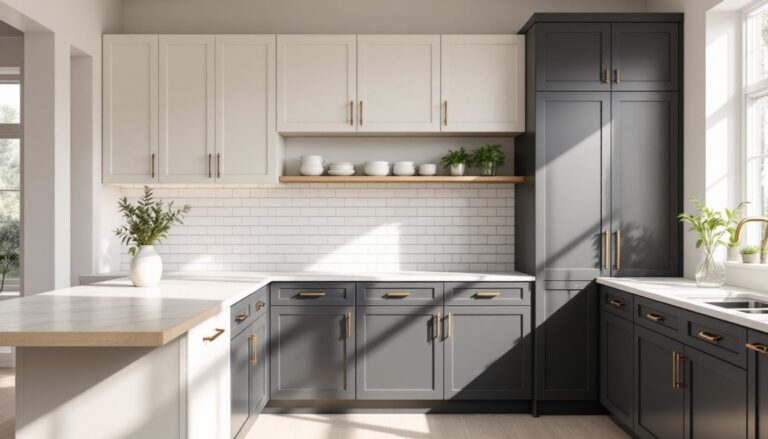
Modern minimalist kitchens rely on clean lines and understated elegance, and the backsplash plays a crucial role in that aesthetic. Flat white or light gray ceramic tiles in large formats, 12×24 inches or bigger, create an expansive, uncluttered feel. Matte or satin finishes avoid the shine that glossy tiles can add, keeping the space calm and sophisticated.
Another minimalist favorite is a solid color glass backsplash in soft neutrals like cream, dove gray, or pale green. Glass is non-porous, making it low-maintenance and easy to clean, though you’ll want to carefully plan seams since large spans can show every fingerprint and water spot. Consider matte black grout lines for subtle definition without visual noise.
Metal accents work too, stainless steel or brushed copper tiles, sometimes mixed with white ceramic in geometric patterns, add texture without overwhelming the space. The key with minimalist designs is simplicity: limit your color palette to two or three tones, keep grout subtle, and let negative space breathe.
Classic Subway Tile Backsplashes
Subway tile, those iconic 3×6-inch rectangular tiles, remains the most installed backsplash style for good reason. It’s versatile, affordable, and works in traditional, farmhouse, and even transitional kitchens. The standard offset (or running bond) pattern staggers each row, creating visual rhythm without complexity.
White subway tile with white or light gray grout delivers a bright, fresh look, while darker grout emphasizes the tile pattern and adds visual interest. If you want something beyond classic white, consider cream, soft gray, or pale blue subway tiles to add warmth or depth.
Don’t overlook the grout color, it dramatically changes the final appearance. Remodelista and other design platforms showcase how the same subway tile transforms entirely when paired with contrasting grout.
For DIYers, subway tile is beginner-friendly: tiles cut easily with a wet saw, spacing is forgiving thanks to their uniform size, and adhesive spread is straightforward. Expect to spend $8–$15 per square foot installed, though premium tiles cost more. Installation typically takes a weekend for a standard 30–40 square-foot backsplash, and sealing grout afterward prevents staining (use a silicone-based grout sealer, not just caulk).
Colorful and Bold Statement Backsplashes
Ready to make a statement? Bold backsplashes in jewel tones, deep greens, navy, or terracotta bring personality and energy to kitchens. Hand-painted ceramic tiles or encaustic patterns (where color is baked into the tile body) add artisanal character, though they cost more than factory-standard options.
Mosaics, small tiles arranged in geometric or representational patterns, create focal-point drama. A simple diamond or chevron mosaic in contrasting colors keeps things modern, while intricate floral or tile-art mosaics suit eclectic or vintage aesthetics.
Glass backsplashes in saturated colors (deep teal, warm amber, forest green) catch light beautifully and hide smudges better than white. Subway-style colored tiles in matte finishes avoid a cheap, plastic appearance.
When choosing bold colors, pull samples and live with them near your countertops and cabinets for a few days. Lighting changes how colors read, a green that looks perfect in daylight might feel too dark under warm kitchen lighting. Start bold in the backsplash area only, keeping cabinets and counters neutral if you’re unsure: it’s easier to replace backsplash tiles than repraint or replace cabinetry if you change your mind.
Elegant Natural Stone and Marble Options
Natural stone backsplashes, marble, travertine, slate, and granite, add luxury and timeless elegance. Marble, particularly in white Carrara or dramatic black-and-white varieties, exudes sophistication but requires sealing every 3–6 months to protect against stains and etching from acidic foods and cleaners.
Travertine offers a warm, earthy aesthetic and is more forgiving than marble, though it still needs sealing and has small pits that collect dust and grease.
Slate brings drama with dark charcoal and gray tones: its natural texture hides splatters but can be rough enough to catch fibers from cleaning cloths. Granite is durable and heat-resistant but typically installed in thicker 1.5-inch slabs (not tiles), making it heavier and more expensive.
Natural stone typically costs $15–$40+ per square foot (materials only), and installation by a professional is recommended because the material is heavy and can be brittle. Sealing is not optional, it’s essential to prevent staining and water damage.
For DIYers, smaller stone tiles (4×4 or 6×6 inches) are more manageable than large slabs. Use high-quality thin-set mortar designed for stone, and apply sealer after grouting cures fully (usually 72 hours). Houzz features stunning stone backsplash examples across every budget and kitchen style.
Budget-Friendly Backsplash Ideas for DIY Projects
Not every kitchen backsplash demands a big budget. Peel-and-stick tiles (vinyl or faux-fabric options) cost $50–$150 for a standard backsplash and require zero grout or mortar. They’re renter-friendly, removable, and come in countless patterns and colors. Prepare the wall with soap and water, let it dry completely, and apply the tiles. The downside: they’re less durable than ceramic or stone, can peel at edges over time, and aren’t heat-resistant near cooktops.
Ceramic subway tiles remain budget kings at $2–$5 per square foot, especially when you install them yourself. Standard white or cream subway tile with simple grouting costs roughly $100–$200 in materials for a typical 30-square-foot backsplash.
Painted plywood or drywall behind the stove offers a temporary, ultra-cheap solution: prime and paint with high-quality kitchen-grade paint, then seal with polycrylic to protect against splashes. It won’t last decades, but it’s a quick refresh for renters or while saving for permanent upgrades.
Shiplap or reclaimed wood adds rustic charm, though wood must be sealed and is not ideal directly behind a cooktop due to heat. Use it on one wall section, paired with tile near the range.
To minimize costs on a tile project: buy standard sizes (3×6 subway, 12×12 ceramic) in solid colors, do the labor yourself, and invest in good grout and primer. DIY installation saves 40–50% compared to hiring pros.
How to Choose the Perfect Backsplash for Your Kitchen
Choosing a backsplash involves balancing style, durability, and practicality. Start with your kitchen’s overall design: does it lean traditional, modern, farmhouse, or eclectic? A subway tile works nearly everywhere, while encaustic or artisanal tiles suit specific aesthetics.
Consider durability and maintenance. Glass and ceramic tiles are easiest to clean and require no sealing. Natural stone demands regular sealing. Peel-and-stick tiles won’t withstand heat or heavy scrubbing. If you have a gas cooktop or frequently cook with high heat, avoid heat-sensitive materials like peel-and-stick vinyl directly above the range.
Lighting matters: pull samples and observe them in your kitchen at different times of day. A light-reflective tile can brighten a dim kitchen, while a matte finish prevents glare. Grout color dramatically impacts the final look, darker grout emphasizes pattern, lighter grout minimizes it.
Your skill level and timeline matter too. Subway tile installation is forgiving for DIY beginners: intricate mosaics or large stone slabs are better left to professionals or attempted with realistic expectations. Homify’s guide to 10 types of splashbacks showcases installation photos and material close-ups to help you visualize options in real kitchens.
Finally, live with paint samples or tile mock-ups for a week. Backsplash trends shift, but your kitchen won’t, so choose something you genuinely love, not what’s fashionable.
Conclusion
Kitchen backsplash pictures offer endless design possibilities, from minimalist white tile to bold jewel-toned statements. Whether you’re a confident DIYer tackling subway tile or a homeowner gathering inspiration before calling a pro, the right backsplash refreshes your kitchen and reflects your style. Start by assessing your space, budget, and skill level, then choose materials that balance aesthetics with durability. With thoughtful planning and honest execution, your backsplash becomes both a practical splash guard and a design anchor that ties your kitchen together.