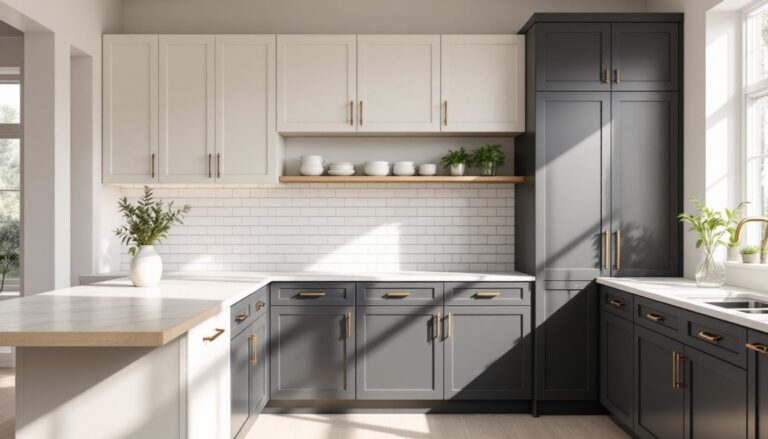
Mobile home bathrooms have always been tight spaces, and that cramped feeling is exactly why a walk-in shower is such a smart upgrade. Unlike traditional tub-and-shower combos that eat up floor space and feel claustrophobic, a borderless walk-in setup makes even a small bathroom feel more open and functional. Beyond aesthetics, walk-in showers are practical, they’re easier to clean, safer for aging in place, and they maximize square footage in ways that standard fixtures simply can’t match. If you’re thinking about renovating your mobile home bathroom, a walk-in shower is one of the highest-impact projects you can tackle.
Table of Contents
ToggleKey Takeaways
- A walk-in shower for mobile homes creates the illusion of 20–30% more space while eliminating trip hazards, making bathrooms feel open and safer for aging in place.
- Prefabricated walk-in shower units designed for mobile homes cost $800–$2,500 and arrive ready to install, offering the fastest and most forgiving option compared to custom tile builds.
- Proper waterproofing, accurate 1/4-inch drain slope, and level base installation are critical in mobile homes, where moisture vulnerability and settling can lead to costly hidden water damage.
- Mobile home walls use narrower 2×3 studs instead of standard 2x4s, requiring flexible PVC or PEX tubing and careful planning to accommodate plumbing in tight spaces.
- A hybrid approach—combining a quality prefabricated fiberglass or acrylic base with budget-friendly tile walls—balances durability, moisture control, and cost for mobile home bathrooms.
- Low-flow shower heads (1.5–2 GPM) reduce water usage by 20–40%, a practical upgrade for older mobile homes with smaller water heater tanks and limited water pressure.
Why Walk-In Showers Are Ideal For Mobile Home Bathrooms
Space-Saving Benefits And Design Advantages
Mobile home bathrooms typically run between 35 and 50 square feet, a far cry from their site-built counterparts. A traditional tub-and-shower combo occupies roughly 30 square feet by itself, leaving almost no room for storage, movement, or visual breathing room. A walk-in shower, by contrast, uses a compact footprint (often just 32 to 36 inches deep) while eliminating the encroaching bulk of a tub surround.
The design advantage goes beyond measurements. An open-concept walk-in shower with a barrier-free entry (no lip or threshold) makes the bathroom feel 20 to 30 percent larger visually. Light travels differently, sight lines open up, and the space stops feeling like a box. For homeowners over 55 or anyone with mobility concerns, that low-entry or curbless design also eliminates trip hazards, a genuine safety win in a small space.
Durability is another key factor. Mobile homes experience more vibration and settling than site-built homes, which can stress traditional fiberglass tub units and crack grout lines. A quality walk-in shower system designed to flex slightly with movement tends to hold up better over time. You’ll also spend far less time cleaning a shower-only space: no tub ring, no corner mold traps, just efficient maintenance.
Assessing Your Mobile Home Bathroom Layout And Constraints
Measuring And Planning Before You Begin
Before ordering anything, take accurate measurements of your bathroom and the wall where the shower will live. Mobile home walls are typically 2×3 studs (nominal: actual dimension is about 2.5 inches) rather than the 2×4 studs in site-built homes, so you have less depth for plumbing chases and recessed niches. Measure floor-to-ceiling height, the width and depth of your proposed shower area, and note any existing plumbing or electrical runs.
Check for rot or water damage around the existing shower or tub. Mobile home wall framing is more vulnerable to moisture issues because the spaces between studs can trap humidity. If you find soft spots, discoloration, or mold, you’ll need to address that first, don’t cover problems with a new shower enclosure.
Verify your water lines and drain. Most mobile homes have flexible supply lines and PVC drains, which are accessible but tight. If your current setup is old copper supply line or cast iron drain, you may need to update or reroute. Confirm the current pipe diameter (typically 1/2-inch supply, 2-inch drain) and check water pressure: low pressure (under 40 PSI) may require a booster or a pressure-regulating shower head.
Determine whether your floor can handle the weight and moisture. Mobile home floors are often 3/4-inch plywood over engineered joists spaced 16 or 24 inches apart. A walk-in shower base and enclosure are heavier than a tub, and the concentrated water load on a small footprint demands proper support. If your floor flexes noticeably when you walk on it, you may need to reinforce the joists underneath before installation.
Choosing The Right Walk-In Shower System For Your Space
Prefabricated Units, Custom Build Options, And Material Selections
You have three main paths: prefabricated fiberglass or acrylic shower kits, tile-and-mortar custom builds, or hybrid systems (a fiberglass base with tile walls). For mobile homes, prefabricated units are the fastest and most forgiving choice. Brands like Aqua, Mirolin, and DreamLine make modular shower enclosures specifically designed for tight spaces. These units arrive ready to install, with integrated drains, grab bars, and a factory-sealed base, no grout, no slopes to perfect, no curing time. They typically cost $800 to $2,500, depending on size and finish.
The trade-off is limited customization. If you want a specific color, layout, or niche placement, a custom tile build gives you control. But, tile requires expertise in waterproofing, sloping, and grout maintenance. Installation is slower (plan for curing and grouting time), and mistakes, like improper membrane application or inadequate pitch toward the drain, lead to leaks and mold that can hide behind walls for months before you notice damage. Custom builds typically run $2,500 to $5,000+ in labor and materials.
For mobile homes, a hybrid approach often makes sense: use a quality fiberglass or acrylic shower base (pre-sloped, pre-drilled) and side it with cement board and budget-friendly tile for walls. This balances durability, moisture control, and cost. The base handles the critical waterproofing job, and tile on the walls is forgiving if you make mistakes.
Material selection matters for longevity. Acrylic and fiberglass bases are lightweight (good for mobile homes) and easy to clean, but acrylic is more durable and resists fading better over 15+ years. Cultured marble is a middle ground, heavier, more luxe-looking, but prone to scratches and requires sealing. For walls, ceramic tile is affordable and forgiving, while porcelain is denser and more stain-resistant (good in humid mobile home climates). Avoid cheap fiberglass walls in high-humidity environments: they yellow, sweat, and trap mold faster.
Also consider water-saving features. A low-flow shower head (1.5 to 2 GPM, vs. standard 2.5 GPM) cuts water usage by 20 to 40 percent, meaningful in older mobile homes with smaller water heater tanks and limited pressure. Many regions now recommend low-flow plumbing fixtures as a best practice: it’s not just green, it’s practical for mobile living.
Step-By-Step Installation Process For Mobile Home Walk-In Showers
Prep and removal: Turn off water at the main. Remove the old tub or shower surround (usually held by caulk and nails: a flat pry bar and hammer are your friends). Dispose of the old fixture carefully, tubs are bulky and sharp-edged. Inspect and clean the subfloor and wall framing. Any soft spots in plywood must be cut out and replaced with new 3/4-inch exterior-grade plywood, screwed (not nailed) every 8 inches to maintain water resistance.
Waterproofing: Seal the subfloor and walls with a cement board underlayment (if doing a tile build) or the membrane recommended by your prefab unit’s manufacturer. If using cement board, tape all seams and corners with alkali-resistant mesh tape and thin-set mortar. Apply a waterproof membrane over cement board (systems like Redgard or Schluter-Systems are industry standard). For prefab units, most come with their own integrated waterproofing, but always verify the manufacturer’s instructions for edge sealing and backing preparation.
Plumbing: This is where mobile home constraints show up. You’ll likely need to tap into existing 2×3 walls, which leaves minimal space. If rerouting drain or supply lines, use flexible PVC or PEX tubing to your advantage, it navigates tight spaces better than rigid copper. Slope the drain 1/4 inch per foot toward the trap (a non-negotiable rule: improper slope causes standing water and mold). Rough-in the drain and supply before setting the base. Pressure-test with a bicycle pump to confirm no leaks under the pressure of use.
Base installation: Set the prefabricated or custom base in a bed of thin-set mortar (not just silicone, it won’t support the weight properly). Use shims to ensure the base is level: even a 1/4-inch slope in the wrong direction creates pooling. Secure the base to wall studs or rim using corrosion-resistant brackets (galvanized or stainless steel). If tiling custom, let the base cure 24 hours before proceeding.
Wall and surround: For a prefab unit, follow the manufacturer’s wall attachment instructions precisely. These enclosures are designed to handle water only if walls are sealed and fastened correctly. For tile, install cement board horizontally with corrosion-resistant fasteners every 8 inches, tape seams, apply waterproof membrane, and lay tile. Grout with urethane or epoxy grout (not sanded cementitious grout, which absorbs moisture). Allow 48 hours cure time.
Finish connections: Install the drain cover, trap strainer, P-trap, and supply lines once the base and walls are fully cured and sealed. Connect to existing supply and vent as needed. Caulk all penetrations and corners with silicone caulk (not acrylic), which stays flexible and won’t crack. Do a full water test, run the shower for 10 minutes and inspect under the base and walls for drips.
When to call a pro: If you’re uncomfortable soldering copper, rerouting drain vents, or troubleshooting low water pressure, hire a licensed plumber for the rough-in. Plumbing mistakes in mobile homes are costly and hidden. If you’ve never tiled, consider having a tile pro handle walls even if you install the base yourself. A bad grout job leads to silent water intrusion that damages framing months later.