A kitchen island with sink and seating has become the centerpiece of modern home design, combining function with gathering space. Unlike a traditional island, one equipped with a sink transforms cleanup duties and food prep into interactive moments, your family doesn’t disappear into a separate kitchen but stays connected to the action. Adding seating takes it further, creating a natural spot for breakfast, assignments, or casual conversation. Whether you’re planning a new build or a renovation, this guide walks you through design choices, space requirements, plumbing considerations, and material selection so you can nail the installation.
Table of Contents
ToggleKey Takeaways
- A kitchen island with sink and seating centralizes cleanup, improves workflow, and transforms the island into a social hub for family and guests.
- Plan for at least 42 inches of clearance (48 inches for two-way traffic) around your island and allocate 30 inches of counter space per seated person for comfort.
- Plumbing is the most complex phase—budget $800–$2,000 for professional installation and consult your local building department before running supply and drain lines.
- Quartz countertops ($55–$120 per square foot) offer the best durability for kitchen islands with sinks, while butcher block provides warmth but requires regular maintenance.
- Match barstool height to your countertop (24-inch seats for 36-inch counters) and allow 26–30 inches of linear space per stool for proper ergonomics and comfort.
- Modern designs feature waterfall edges and undermount sinks, while farmhouse styles showcase apron-front sinks and deeper overhangs (15–18 inches) for traditional appeal.
Why Choose a Kitchen Island With Sink and Seating
A kitchen island with sink and seating solves multiple problems at once. The sink placement centralizes cleanup and dishwashing, reducing the number of trips to your main sink across the kitchen. That saves steps during meal prep and entertaining, no small thing when you’re hosting a dinner party. Seating transforms the island from a prep surface into a social hub. Kids can sit at the counter while you cook, keeping them in sight and involved. Guests naturally gravitate to a barstool instead of hovering awkwardly in a corner. Functionally, an island with seating also improves kitchen workflow. You can assign one family member to chop vegetables while another handles plating, all within arm’s reach. The sink itself becomes a secondary cleanup station, which is especially useful during holiday cooking marathons when the main sink gets overwhelmed. From a resale perspective, kitchens with islands are consistently ranked among the top home improvement returns, and adding a sink increases that appeal significantly.
Design Styles and Layouts to Consider
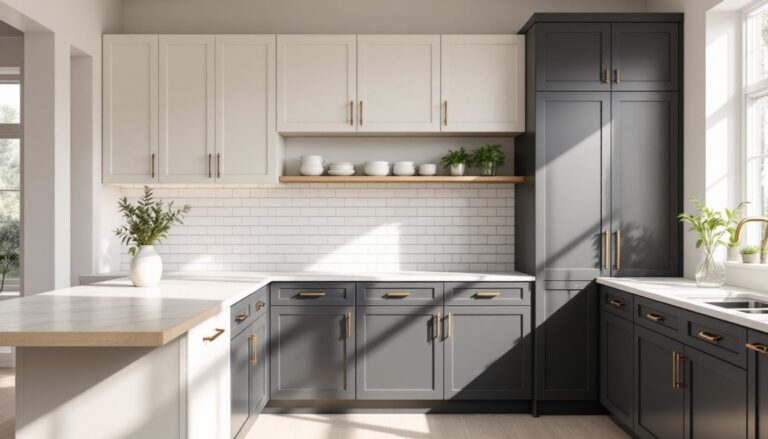
Modern and Minimalist Designs
Modern island designs emphasize clean lines, integrated appliances, and understated finishes. A waterfall edge, where the countertop material wraps down one or both sides of the island, creates a sleek, unified look and hides the base structure. Pair this with flat-panel cabinetry (no frame-and-panel detailing) and handle-less drawers for a truly contemporary feel. Stainless steel or matte black sinks pair well here, and undermount styles keep edges flush with the countertop. Minimalist design also works well with an open base: no lower cabinets on one side, just bar seating with stools tucked underneath. This approach maximizes legroom and makes the kitchen feel less cramped.
Traditional and Farmhouse Options
Farmhouse islands often feature a stationary footprint with frame-and-panel cabinetry, turned legs, and a deeper overhang (typically 15–18 inches) to accommodate seating comfortably. Apron-front (or farmhouse) sinks, those with a visible front, are a natural fit here, paired with bridge faucets or traditional widespread faucet styles. The look pairs beautifully with butcher-block or wood countertops, though stone or quartz work too. Many homeowners add open shelving on lower tiers, creating a display area for cookbooks or vintage kitchen pieces. Traditional islands often include a prep sink separate from seating areas, with the sink positioned on one end and seating on the opposite side to keep food prep distinct from dining space. Consider consulting resources like 20 kitchen islands with seating and storage to see how different styles balance both functions.
Essential Planning: Sizing, Space, and Plumbing
Before ordering materials, measure your kitchen carefully. A kitchen island with sink and seating requires generous clearance. The National Kitchen and Bath Association (NKBA) recommends at least 42 inches of clearance between the island and counters or appliances on all sides: 48 inches is better for two-way traffic. Your island length should match these proportions: a typical island runs 36–48 inches wide and 24–36 inches deep. If you’re adding seating for three, plan on 30 inches of linear counter space per person (accounting for arm space and legroom).
Plumbing is where complexity increases. You’ll need to run supply lines (hot and cold) and a drain line from the main stack. This is not a cosmetic project, depending on your floor structure, you may need to cut joists or route lines through the rim band, which could require a structural engineer’s approval or a building permit. Check with your local building department before breaking ground. If your island sits over a basement, running lines downward is straightforward. If it’s over a crawlspace or on a second floor, you’ll likely need to run supplies up through interior walls, which means coordinating with existing framing. Many DIYers hire a licensed plumber for this phase: budget $800–$2,000 for labor and rough-in work, depending on your region and line complexity. A consultation with kitchen design professionals can help clarify whether your layout is plumber-friendly. Once rough-in is complete, your finish work (connecting the faucet, hooking up the drain trap) is more manageable for a confident DIYer.
Materials and Finishes for Durability and Style
Countertop material sets the tone and endures the heaviest use. Quartz is the current workhorse: non-porous, scratch-resistant, and low-maintenance. Engineered versions run $55–$120 per square foot installed. Butcher block delivers warmth and traditional appeal but requires regular oiling and is vulnerable to water stains if not sealed properly: expect $40–$80 per square foot. Granite and marble offer elegance but need sealing and are softer than quartz. For an island sink, choose a stainless steel undermount sink (304-grade minimum: 316 is marine-grade and pricier but corrosion-resistant) or a fireclay apron-front sink for farmhouse aesthetics. Install a high-arc faucet with a pulldown spray, you’ll want reach and flexibility for a secondary sink.
Base cabinetry should match (or intentionally contrast with) your kitchen’s existing cabinetry. Stock cabinets run $100–$300 per linear foot: semi-custom options range $150–$500. If building from scratch, use 3/4-inch plywood for the island frame and 2×4 studs (actual 1.5″ × 3.5″) for legs, ensuring the structure can support 50 pounds per running foot of countertop and live load. Finish selections matter too: polyurethane provides durable, water-resistant protection on wood. For a painted look, prime with bonding primer and use kitchen-grade enamel paint (satin or semi-gloss), it resists moisture better than flat.
Seating Options and Barstool Selection
Barstool height must match your countertop height. Standard counters are 36 inches tall, so pair them with 24-inch-seat-height stools. If you build a raised bar within the island (a second tier 12 inches above the main counter), use 18-inch stools instead. Allow 26–30 inches of linear counter space per stool, tighter spacing feels cramped, and you’ll regret saving those 4 inches. Swivel stools offer flexibility in small kitchens: fixed stools take up slightly less space but are less adjustable.
Material choices balance durability with comfort. Upholstered seats in performance fabric (microsuede, leather, or solution-dyed polyester) resist spills better than natural fabrics. Wood seats require finishing (polyurethane or lacquer) to withstand moisture and temperature swings. Metal frames should be powder-coated or stainless to avoid rust. Backless stools tuck under overhangs neatly and work great in modern designs: low backs (12–18 inches) add comfort without blocking sight lines: full backs suit farmhouse or transitional styles. Budget $80–$250 per stool for quality construction that won’t wobble after two years. For inspiration and real-world examples, curated kitchen island designs showcase how seating integrates with different aesthetics.